

How To Engrave On To Pebbles Templates

Glass engraving is an art form that has been effectually for thousands of years, and one we're pleased to say has become increasing popular ever since.
Anyone with a creative streak tin can have a get by using a pocket-size selection of diamond burrs in a pin vice or a rotary tool. What may start as a fun hobby can quickly turn into a defended skill, leading yous into more than avant-garde techniques and further tools.
There are several ways to engrave glass, lets accept a look at them and the tools and techniques they involve. There's a glossary at the stop also to help with any words you may not exist familiar with.
1) Paw held Pivot Vice with a Diamond Burr
This is by far the cheapest and near simplest method of glass engraving and one which is swell for the absolute beginner who may want to try out their skill earlier buying a rotary hand drill such as a Dremel with flexible shaft or a Micro Motor.
Teaching groups and classes will oft use this technique as it is cost constructive and no electricity is required. Similar tools tin can exist used for stipple engraving which is mentioned further on, and any linear engraving can be done past using a pin vice with a diamond betoken burr.
Tools Needed:
- Pivot Vice - double ended pivot vice
- Diamond Burr - 2mm small-scale diamond ball burr
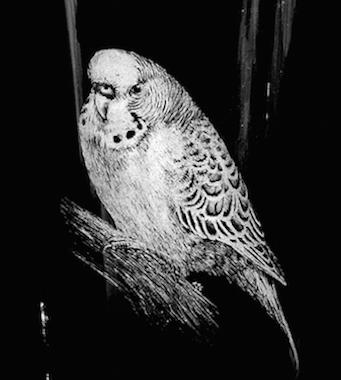
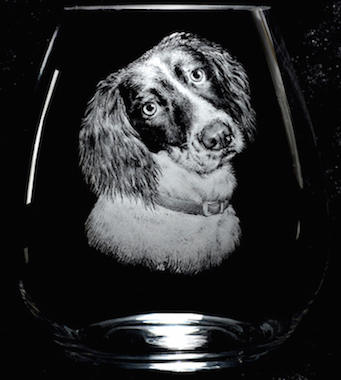
The in a higher place glass engravings by Alan Sinclair are examples of fur and feathers engraved on glass using a diamond indicate burr in a Pin Vice.
2) Drill Technique
This technique is the about popular and versatile, allowing yous to use whatever number of different burrs, points, stones and polishers in either a Micro Motor or a drill with a flexible bulldoze attachment
Beginners tend to employ a hobby rotary tool such as a Dremel, and so progress to adding a Flexible shaft, or flex-shaft zipper. This allows you lot to hold the handpiece as you would a large pen.
Finally, once you've actually caught the glass engraving bug, motility onto the more than expensive and superior of tools, a Micromotor such equally the Medicool Pro Power - a professional dental drill that has no vibration, almost no dissonance and amid many other attributes, a very light handpiece, so no more aching wrists!
Rotary tool options:
- Micromotor - Medicool Pro Power 35K Micro Motor
- Rotary Drill - Dremel 3000 with Dremel Multi Chuck (essential to agree a variety of dissimilar sized burrs and polishers)
- Flexible Shaft - Dremel Flexible Shaft
The drill technique involves grinding abroad the glass past using a diversity of diamond burrs, stone burrs and polishers.
With so many unlike shapes and types of diamond burrs, and the huge variety of stone burrs and polishers, information technology can be hard to know what to buy to begin with. Essentially you could start past buying ane diamond ball burr to brainstorm practicing with and and then move on to adding shade and furnishings with further stone burrs and polishers. This is when a kit such as the post-obit one is great for the beginner, ensuring yous have a small diversity of everything you may need to begin with:
- Beginners Glass Engraving Kit - Glass Engraving Kit (Bare Minimum)
- Intermediate Glass Engraving Kit - Drinking glass Engraving Kit (Experimental)
- Professional person Drinking glass Engraving Kit - Glass Engraving Kit (Professional)
It should be noted here that if yous are using a hobby rotary tool you will need to make sure it has an adjustable chuck. The shank of most burrs and mandrels will exist 2.35mm in size (iii/32 inches)
For instance if you are using a Dremel rotary drill or Dremel Flexible shaft you will need to buy the Dremel Multi Chuck as well. This small chuck closes from 0mm - iii.4mm in size.
For aid on how to use the individual attachments have a look at our previous article 'five Essential Beginners Glass Engraving Tools'
Helpful tips on the drill technique:
Keep a basin of water nearby to wipe away the dust from your work every once in a while, or a spray bottle with water in. Alternatively make your own water drip feed system. The diamond burrs need to be kept lubricated with water to prevent them from overheating. Overheating volition cause the diamond grit to autumn off, burn away (they burr will turn brown) or wear away quicker. Overheating can also cause the glass to crack.
Safety notes for the drill technique:
Using a drill to engrave causes grit to wing around so it is imperative that you clothing a dust mask. It'south also advisable to habiliment long sleeves and brand certain you lot have no flowing items of clothing on such as scarves or baggy sleeves, equally, no long jewellery chains or long hair that could potentially go defenseless up in the drill string or rotary burr every bit it'south whizzing around. Wear goggles at all times.
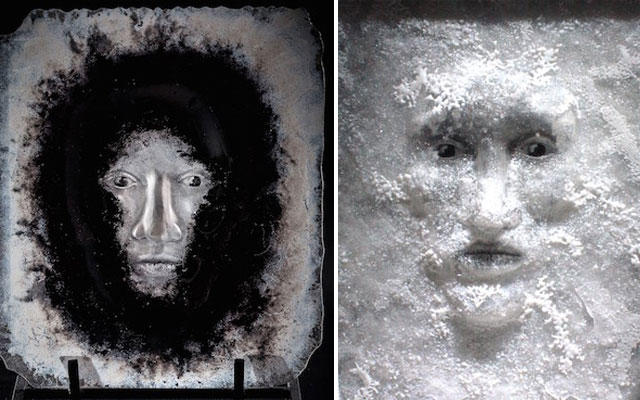
The first of the above 2 images by Guergana Sabkova is entitled 'Awakening' and is a combination of the Drill technique with Sand Blasting. The second image 'The Frost' has been drill engraved into a combination of fused drinking glass. Guergana uses various combined techniques for her finished engravings. Have a expect at more than of her piece of work on her website: Reflexion Glass
Have a expect at the work of Nancy Sutcliffe, Susan Bloch and Margot Jacobs in our commodity '9 Brilliant Examples of Drinking glass Engraving to Inspire You' to see further examples of the drill and sand blasting techniques.
3) Copper Wheel
Copper wheel engraving is a traditional technique oftentimes used for cut glass crystal designs. Differing sizes and profiles of copper wheels mounted onto spindles are driven by a chugalug on a lathe. The wheel is turned by use of a foot pedal and the bicycle is fed with an annoying compound such as carborundum. The glass is brought to the wheel to make the cut.
Nowadays, rock and diamond wheels are more ordinarily used and are driven by an electric motor instead of a pes pedal.

The above image by Greg Sullivan is of The Unicorn Carousel and has half-dozen unicorns copper wheel engraved around it. In that location'south besides some diamond point piece of work (the lettering and smaller imagery on the hat). When plugged in, the base of operations remains stationary but the unicorn's rotate.
To view the assembly video of the engraving accept a look at Greg'due south facebook page.
iv) Sandblasting
Sandblasting is sometimes known as sand carving or sand engraving. The areas of drinking glass not to be engraved will exist covered with a masking material then a fine dust abrasive medium is 'blasted' at high pressure onto the surface of the glass.
Skilled glass engravers will use hand-cutting stencils and a mixture of techniques such as sandblasting with the drill technique to create some very interesting results.
Quite often the sandblasting technique is used on an industrial scale for mass productions of drinking glass designs.
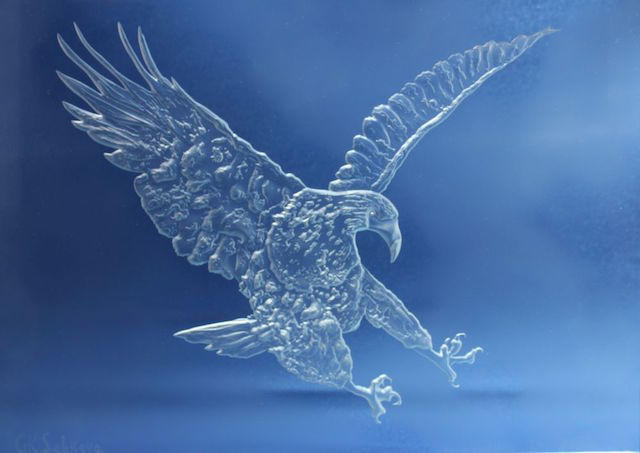
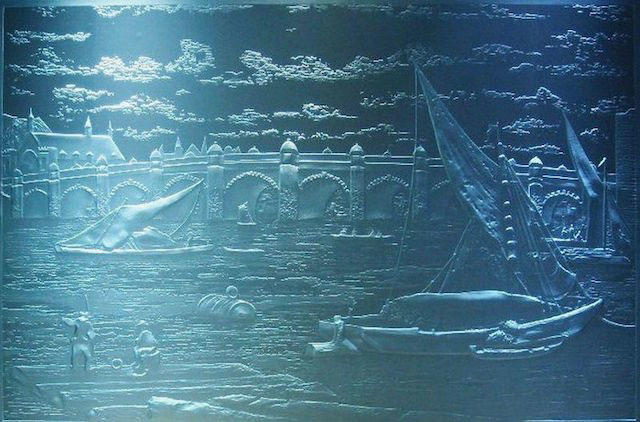
The above two images are 'The Dreaming Duck' and 'The Span' both by Guergana Sabkova.
5) Stipple
Stipple engraving is a technique that requires a lot of patience and skill. The pattern on the drinking glass, lead crystal ideally, is fabricated using repetitive tapping from a carbide point to creative small indentations or dots. The resulting picture leaves a misty look.
Carbide points are more commonly used as they tin can be re-sharpened and leave a clean cut, but a diamond burr or point can also be used for the beginner stipple engraver
The tungsten carbide point is held in a pin vice or stylus of some kind.
Tools Needed:
- Carbide Scriber or stylus
- Pin Vice - double ended pivot vice to hold a Carbide Centre Tool , carbide indicate or diamond betoken burr
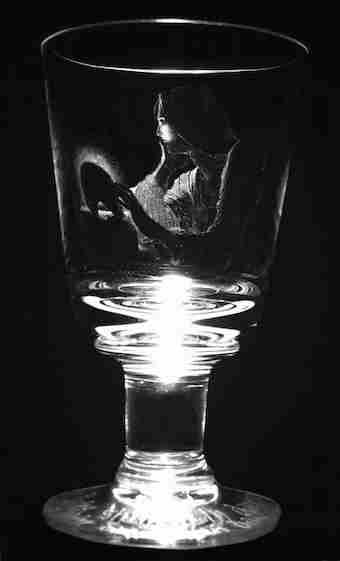
The to a higher place is an example of stipple engraving done past Junko Eager entitled 'Mary Magdalene', The inspiration for the piece was taken from the 18th century French painting of De la Tour. The stippling was done on a Dartington crystal goblet. To meet more of her work, visit Junko's website: Junko Eager: Glass Engraving Artist
Light amplification by stimulated emission of radiation Engraving
As the name suggests, laser engraving onto glass is done with a laser which burns your blueprint onto the glass. This method is often used for large calibration orders where duplication of the image is necessary; company logos and merchandise items for case.
Etching
Strictly speaking, etching is not a class of engraving just i where an acid paste and a stencil is used to create a matt terminate on the drinking glass. You can buy fix made etching stencils or you can use a scalpel to cutting out your own stencils in adhesive paper. Acid etching and engraving combined tin produce some interesting results.
Glossary:
A Burr (Bur)is a cutting tool with a shaped finish. Diamond Burrs (Sometimes referred to as diamond points) come in many shapes and sizes and with varying grades of grit. The finer the dust, the smoother the stop. A diamond burr consists of the working finish (this is the shaped cutting end you will use to engrave the glass) and this is made up of diamond particles, or grit, which is bonded to the metallic shank.
The shank (or shaft) is the terminate of the tool that goes into your drill, chuck, pin vice or rotary tool manus piece.
A Chuck is an attachment for property a work-piece or tool in a machine (such as a drill or lathe)
Rotary tool (Rotary Drill) An electrical drill that rotates tools or attachments.
A Mandrel (spindle) in the case of drinking glass engraving and jewellery tools this is the mount or attachment that fits into your chuck or drill. Unmounted polishers and abrasives are threaded or screwed onto a mandrel and then inserted into a drill, either straight or into a chuck.
----------------------------------------------------------------------------------------------------------------------------------------------
Helpful Links
Shop for your Drinking glass Engraving Tools
Read this helpful article: five Essential Beginners Glass Engraving Tools
Join The Society of Glass Engravers
Learn the the art of Glass Engraving at Richmond Adult Community Courses, West Dean Higher and Morley College

How To Engrave On To Pebbles Templates,
Source: https://www.eternaltools.com/blog/five-glass-engraving-techniques-and-how-they-are-done
Posted by: levinenes1943.blogspot.com
0 Response to "How To Engrave On To Pebbles Templates"
Post a Comment