

How To Draw A Balloon
The championship of this tutorial may be a picayune misleading considering not but are we creating i balloon drawing, but nosotros are drawing a whole bunch of balloons! Past the end of this tutorial, you volition take a colorful and celebratory bouquet of balloons on your canvas. From getting the shape and texture right to creating a realistic flow, we have you through everything that y'all demand to know to create an easy balloon drawing.
Table of Content
- i Easy Airship Drawing Tutorial in xvi Steps!
- 1.1 Step 1: Drawing Your First Airship
- 1.2 Step 2: Adding the Side by side Two Airship Drawings
- i.3 Step iii: Starting time the Second Row of Balloons
- 1.4 Step iv: Filling the Second Layer of Your Airship Drawing
- 1.5 Step v: Creating the Third Row of Balloons
- one.6 Step vi: Completing the Top Row of Your Easy Balloon Drawing
- 1.7 Step 7: Finishing the Middle Row of Balloons
- 1.8 Footstep eight: Begin Erasing the Overlaps
- ane.9 Step 9: Erasing the Middle Overlap Lines
- 1.10 Step 10: Finishing the Outlines of the Balloon Drawing
- i.11 Step 11: Creating the Strings of Your Balloon Drawing
- 1.12 Footstep 12: Drawing the Knot and the Hanging Strings
- 1.13 Step 13: Adding a Colour to Your Balloon Drawing
- ane.14 Step 14: Creating Depth in Your Piece of cake Balloon Cartoon
- 1.xv Stride 15: Calculation Highlights
- ane.xvi Step 16: Finishing Your Easy Balloon Drawing
- 2 Often Asked Questions
- 2.ane Is It Easy to Create a Airship Drawing?
- two.two What Colors Should I Use for My Piece of cake Balloon Drawing?
Easy Balloon Drawing Tutorial in 16 Steps!
Balloons are cheerful and celebratory, and we are creating a bright and colorful bouquet in this tutorial! The basic shapes of your airship drawing are fairly uncomplicated and quite repetitive, but the trick lies in getting the perspectives right. Some of the balloons volition sit in front of others, so nosotros will build up the bouquet in a few construction steps before creating the final outline and adding color.
When it comes to the drawing medium that y'all choose, information technology really comes down to what you feel nearly comfortable with. If you are a graphic artist, y'all can apply your drawing tablet, or if you prefer a more physical medium like coloring pencils or markers, so you lot tin easily suit the coloring steps.
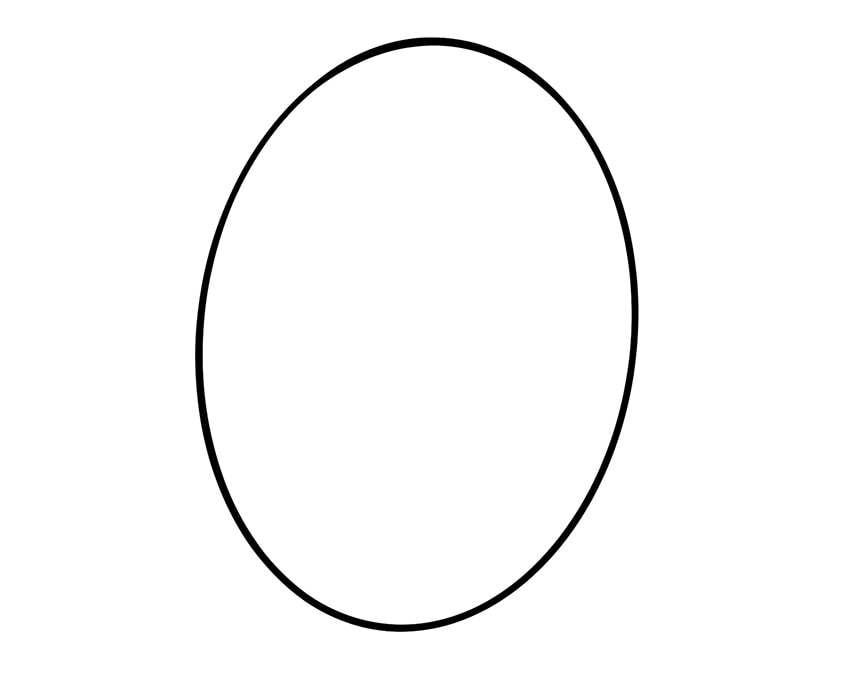
Pace 1: Drawing Your First Balloon
Earlier we begin, off-white alarm that this get-go step is going to be a lilliputian repetitive. We are going to be creating a total of 13 balloons in this tutorial that all overlap with each other. To begin, allow u.s.a. depict the key airship. Find the center of your canvas, and draw a slightly tilted vertical oval.
This shape will stand for the first balloon, and in the post-obit steps, we will surround it with more than airship shapes!
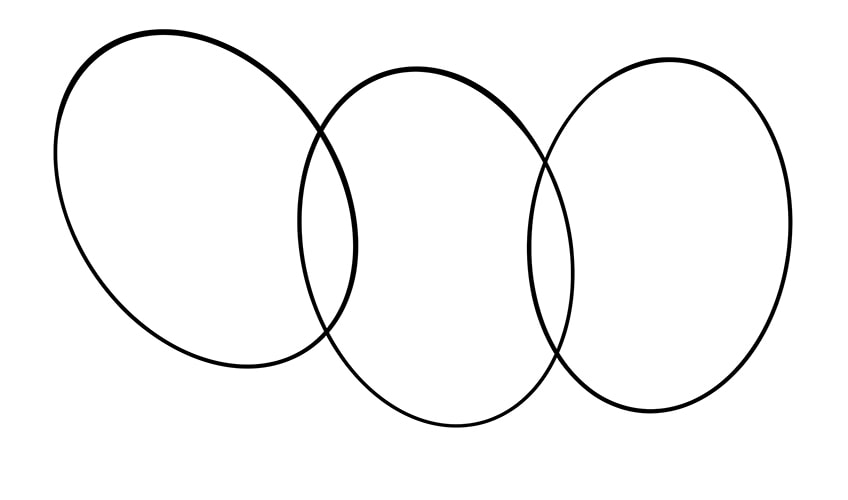
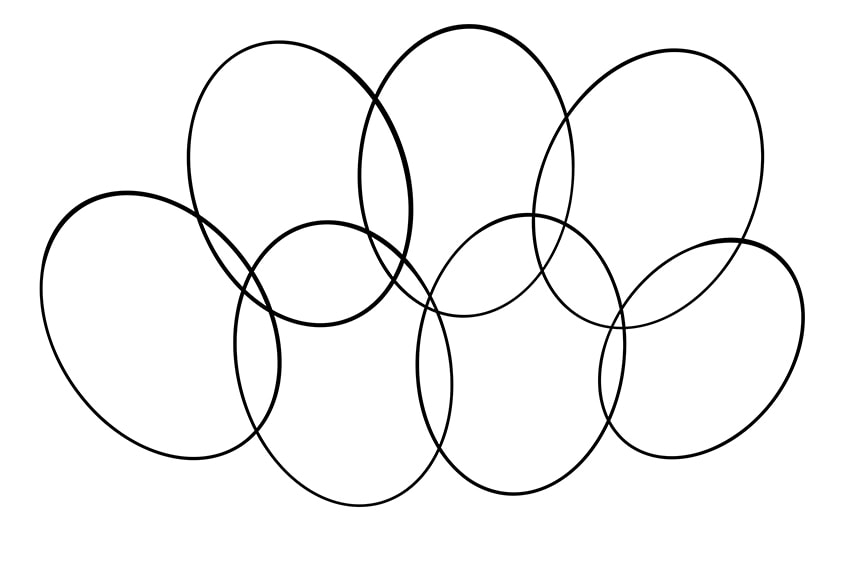
Stride two: Adding the Next Two Balloon Drawings
In this footstep, yous are going to add the next two balloon shapes overlapping with the first. Brainstorm by adding a second balloon shape of the same size and shape on the left of the offset one. This second airship drawing should tilt in the opposite management of the first, and sit ever and then slightly lower. You lot can then add the third balloon overlapping the left of this 2nd.
This third balloon should sit higher than the previous ii and silt even more than to the left.
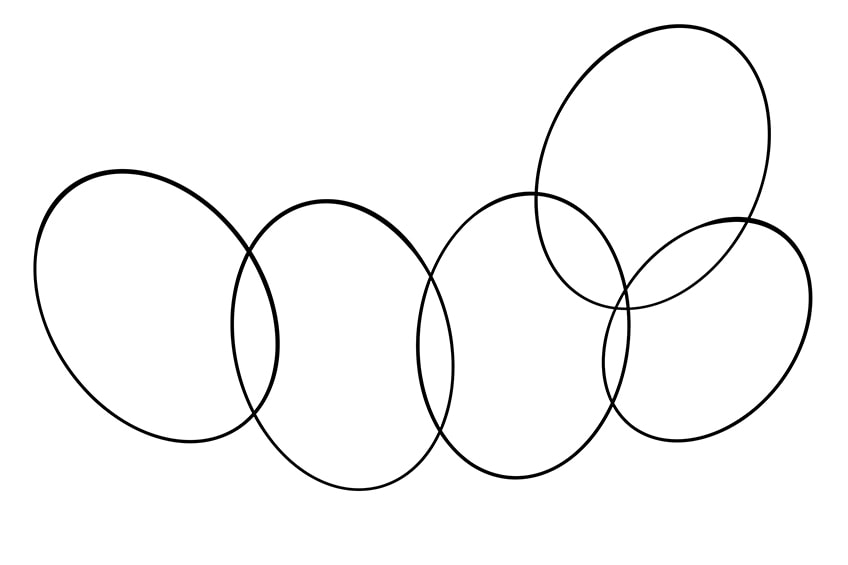
Step iii: Beginning the Second Row of Balloons
We are now going to begin the second row of balloons. Start past cartoon a slightly smaller balloon shape on the very right of the starting time row. This balloon shape should be significantly tilted to the right. Next, you tin can add a slightly larger balloon shape above the 2 balloons on the right. This first balloon of the next layer should overlap the tops of the two correct balloons and should tilt towards the right.
Yous can run across that we are creating almost a fan of balloons, with the outer ones leaning more significantly to their respective sides.
Step 4: Filling the 2nd Layer of Your Airship Drawing
You tin can now add two more airship shapes to the superlative layer of your easy airship cartoon. Repeat the same process, ensuring that the centre oval is the most upright. The oval shape on the left should be slightly tilted to the left. Think that all of these ovals should overlap those around them.
This may seem odd now, but when we create the last outline, this will help us to create a full and three-dimensional bouquet.
Pace 5: Creating the Third Row of Balloons
You can now add a third row of two balloons above the previous one. These 2 airship shapes should sit down in between the three on the 2d row and should overlap them quite significantly.
Remember to add a slight tilt in each direction for both of these balloon drawings.
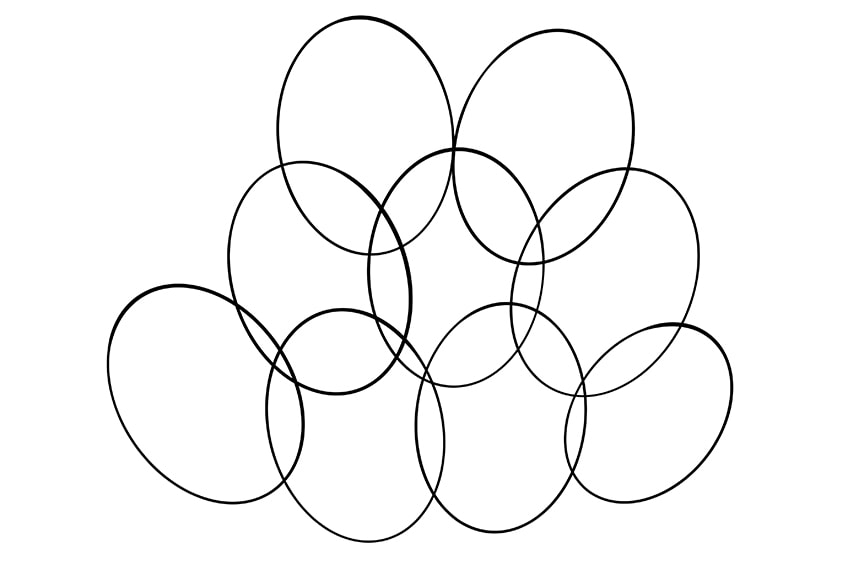
Step 6: Completing the Acme Row of Your Easy Airship Cartoon
For this footstep, you tin can draw two more balloon shapes on either side of the meridian two. In the tradition of the previous airship shapes, these two should tilt towards each side more than the middle two.
You also want to make sure that these 2 side balloons overlap the lesser ones quite a lot.

Step vii: Finishing the Centre Row of Balloons
In the final structure stride, you are going to add two more balloon shapes on either side of the centre row. Both of these airship shapes should exist very tilted to their corresponding sides.
Call back that both of these shapes should as well overlap significantly with the finish balloons of the top and lesser rows.

Footstep 8: Begin Erasing the Overlaps
We now begin the process of creating three dimensions in our easy airship drawing. Let us start with the meridian line, erasing the bottoms of the top ovals where they overlap with the middle row.
In the next few steps, we will continue this procedure down the rows.
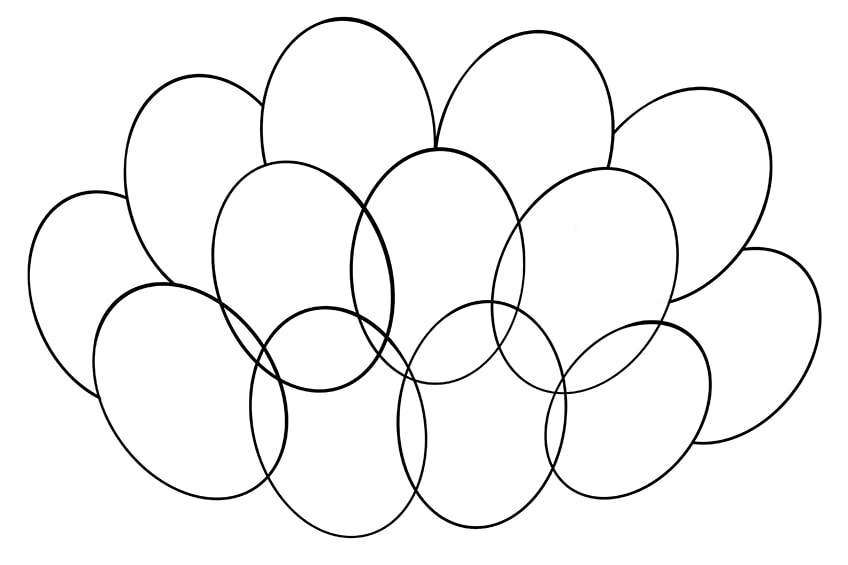
Step 9: Erasing the Middle Overlap Lines
Go on the process of erasing the overlap lines in the middle line. Erase the bottoms of the middle line of balloons in the bottom row.
You too want to erase the side overlaps between the balloons in the row.

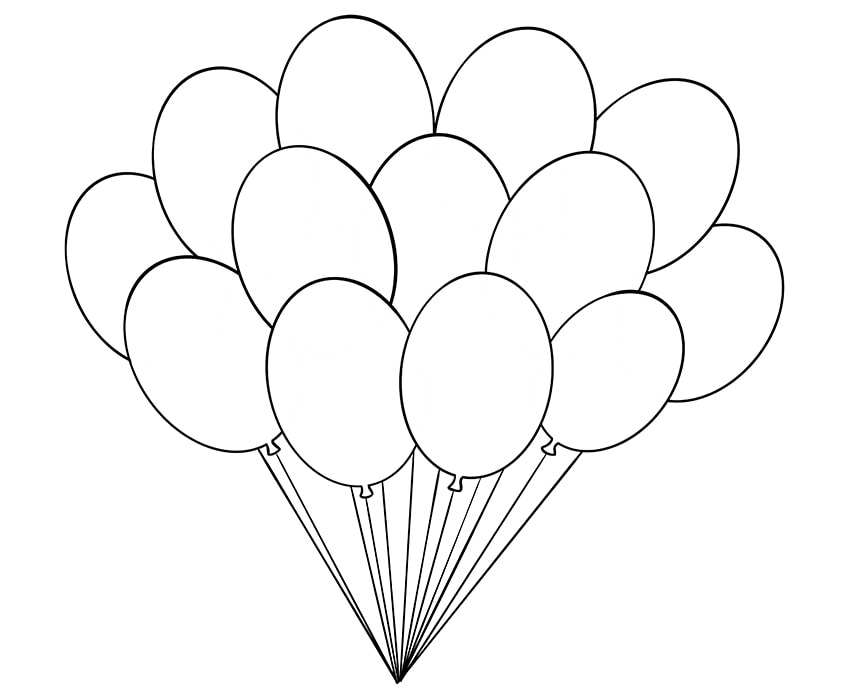
Step 10: Finishing the Outlines of the Airship Drawing
Finish the concluding outline of your easy balloon drawing past erasing the overlapping lines of the bottom row. For the finishing touches, you can add together the air holes on the lesser of the four lower balloons.
This is where we are going to add the strings for the lesser ones in the next steps.
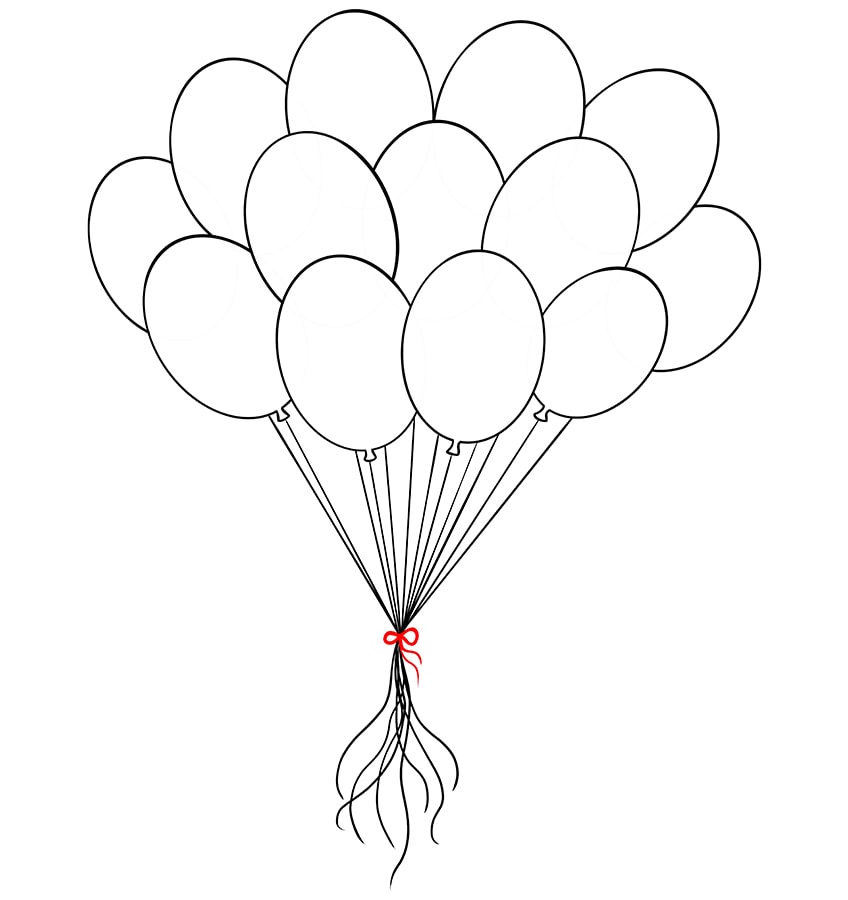
Stride 11: Creating the Strings of Your Airship Drawing
In this stride, y'all are going to depict the string for each of the balloons leading to a fundamental point. Begin with the lesser ones, taking a directly line from each of the air holes. You can then add a few more lines that extend from the full general angle of each balloon.
Remember that yous have a total of 13 balloons, so you want to brand certain that in that location is a line for each one.
Step 12: Drawing the Knot and the Hanging Strings
The strings that extend down from the balloons are direct and taut, but after the knot, they are a little looser and flowing. Begin past drawing these loosened strings with a more natural bend, and so draw a knot or bow shape between the taut strings and the flowing ones.
We take drawn this knot in red, but you tin choose whatsoever color that you would like to.
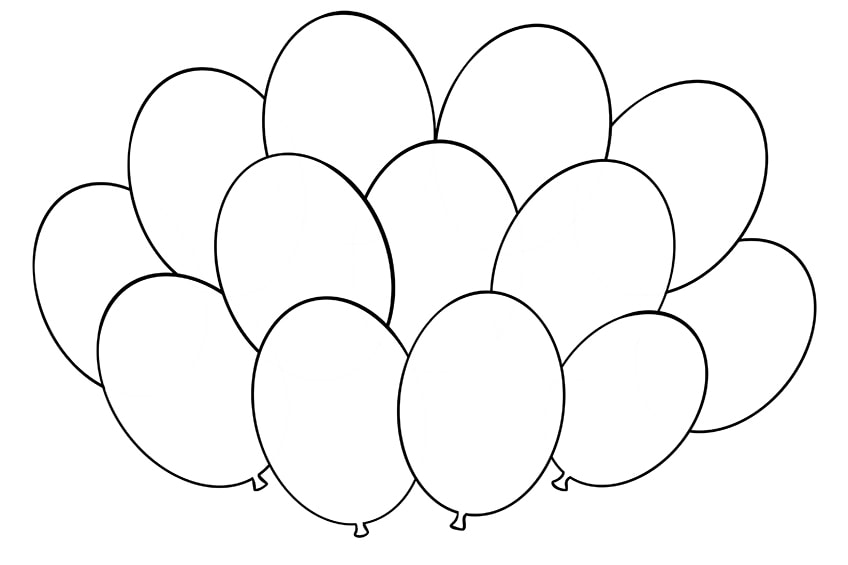
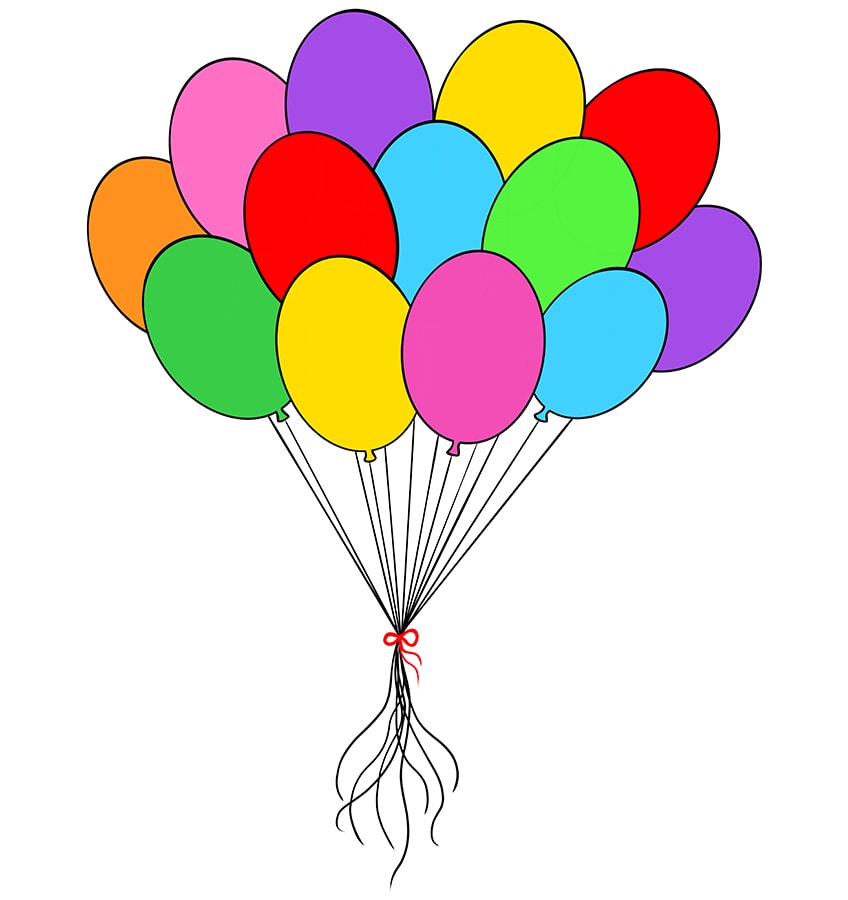
Step thirteen: Calculation a Color to Your Balloon Drawing
At present that you accept the shape of your like shooting fish in a barrel airship drawing finalized, it is time to add some brilliant and blithesome colors. You can choose the colors that you lot would like, just we recommend four or five unlike shades. Use a small brush and pigment each airship with a fairly light coat of color.
Yous want to make sure that the construction lines are barely visible and that the color glaze is even and smooth.
Step 14: Creating Depth in Your Easy Balloon Drawing
At this stage, our airship drawing is looking a little flat. To add some definition and dimension, we are now going to add together some shadows to the balloons. Before you lot brainstorm calculation paint, make up one's mind on a light source bending. We have decided for our example cartoon that the light is coming from the right side of the canvass, pregnant that the shadows on each balloon will autumn on the left edge. Use a minor blending brush and a tiny amount of blackness paint to add some shadows to each balloon.
You can also add some shading surrounding the top of balloons on each layer, to create more three-dimensionality.

Step 15: Adding Highlights
Shading is just one-half of the dimension formula. Highlights are the other half, and that is what nosotros are going to do in this step. Employ a small blending brush and some white paint to add together an area of reflection onto each balloon. Yous tin add the highlight in either a single line or several parts on each balloon. In terms of where to place the highlight, you lot want to add information technology on the top of each airship and and then on the relative side.
The balloons on the right should take a highlight downward the right side and the highlight should be on the left of those balloons on the left.
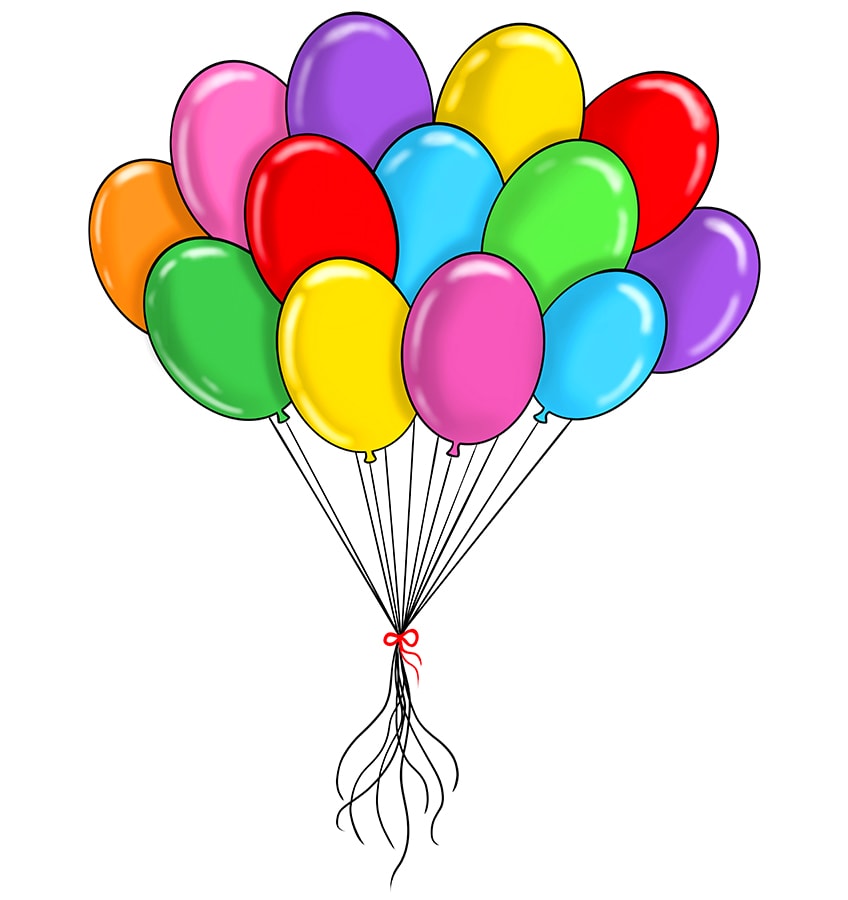
Footstep 16: Finishing Your Easy Balloon Drawing
To finish your balloon drawing, you are simply going to erase the outlines of your balloons to create a seamless result. If y'all are using a drawing tablet, you lot tin can simply delete the outline layer. If y'all are working with a concrete medium, simply trace over the outlines with the corresponding color of each airship.
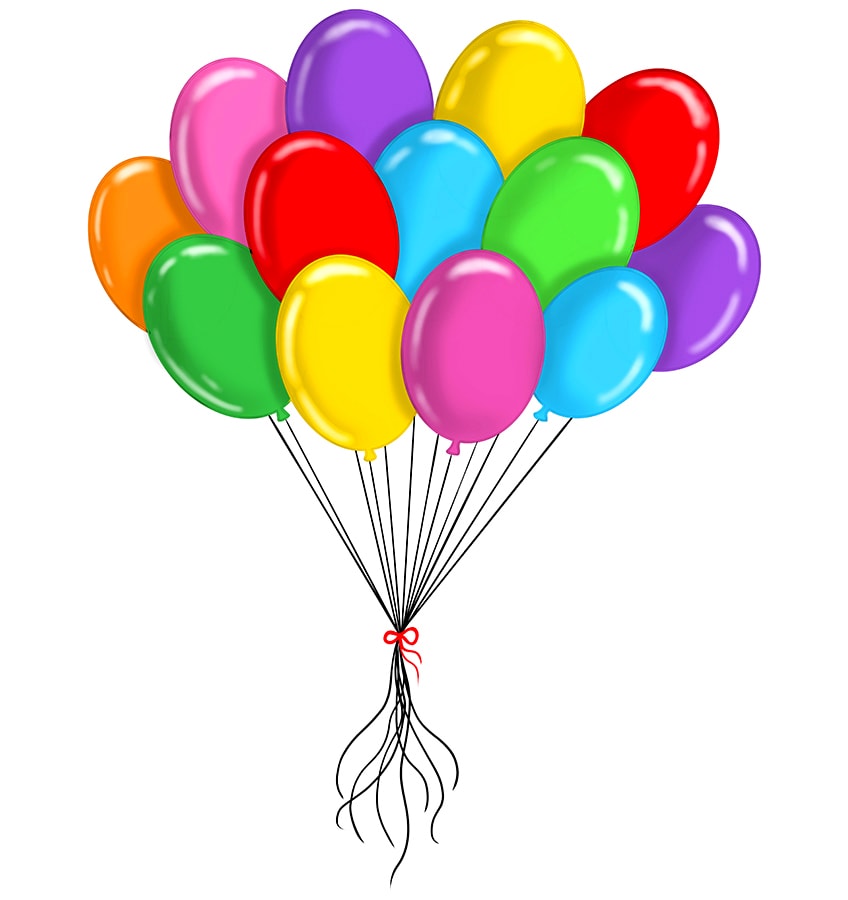
Voila! You have just created your very own cheerful and colorful agglomeration of celebratory balloons! Hopefully you take enjoyed this piece of cake airship drawing tutorial. We hope to see you lot soon for more fun and easy drawing tutorials!
Frequently Asked Questions
Is Information technology Easy to Create a Balloon Drawing?
Learning how to draw a balloon is actually very easy! In our piece of cake balloon drawing tutorial, we help you construct and then colour a drawing of balloons to create a seamless and colorful last drawing.
What Colors Should I Use for My Piece of cake Balloon Drawing?
The colors that you choose for your bouquet of balloons are entirely up to you. We do propose that you lot use some bright and cheerful colors, however, every bit balloons are typically associated with joy and celebration.

Source: https://artincontext.org/how-to-draw-a-balloon/
Posted by: levinenes1943.blogspot.com
0 Response to "How To Draw A Balloon"
Post a Comment